Google Search

Showing posts with label Gmail Tutorials. Show all posts

Friday, April 17, 2009

HOW TO OPEN A GMAIL ACCOUNT? Step by Step Instructions

GMAIL (Google Mail) is one of the most popular free web-based email services today. It is hosted by GOOGLE, the leader in internet technology. Many are switching to GMAIL because it offers a larger disc space, faster loading of messages, added security, and many more that other free web-based email services. The reasons why I switched to gmail is its professional look, fast loading of messages, and value added services that I did not find in other websites that offer free email accounts. It is not surprising that many internet users are asking the following questions: “How do I create a gmail account?” or “How do I sign up a gmail account?” or “How do I register a gmail account?” As an answer to these questions I made this article to teach you on how to open your first gmail account. As a gmail user, I can say generally that I am very contented on how gmail works.

It is very easy to create a gmail account. Just follow these steps:

In your browser type http://www.gmail.com or simply type gmail and press CONTROL + ENTER.
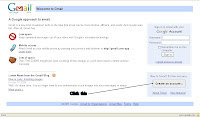


Look at the sign up button and click it. You will then be directed to a webpage containing a form which you will fill in.


Fill up the form correctly. Read the instructions thoroughly and do not rush.

You should register a gmail user name that you could easily remember. It should also be unique which means nobody with gmail account uses it. There is the “check availability” button there which you could use to check whether your desired user name is taken already or still available. If the user name is unavailable, gmail will suggest available keywords related to the unavailable username you entered. Although you can still enter another username of your choice just be sure that it is not being used by other gmail users.

In choosing your gmail password, make sure that it is hard enough for others to guess correctly. It is not advisable to use your birth date. You should enter a minimum of 8 characters in length. I would advise you to make a password made up of letters and numbers (alphanumeric). The most important thing to remember is NEVER FORGET YOUR PASSWORD.

Choose the best security question and NEVER forget the specific answer for that question. You will need the answer if in case you forget your password.


You should also enter a secondary email address (can be your old email account) where gmail will send your password if in case you forget it. If you don’t have other email account, just leave it blank.

Don’t forget to type the word verification and accept the terms of service (TOS) before submitting the form.

Congratulations, you’ve just created your gmail account.

HOW TO MAKE GMAIL DEFAULT TO SSL MODE?

Secure Sockets Layer (SSL) mode gives your gmail account added security. Your gmail account is in the SSL mode if the URL has the “https” protocol instead of the normal “http”. By default gmail does not load in Secure Sockets Layer (SSL) mode. What are the benefits of being in the SSL mode anyway? In my observation, SSL mode makes my gmail account as secured as PayPal. For example if you leaved your email opened after several minutes, it would automatically sign out. Also, after a gmail window(s) is closed, your account automatically closes and you need to log in again in order to access your inbox. So if you forgot to sign out your gmail account, you are assured that it will automatically sign out after several minutes or after you closed the opened gmail windows. However, techy people say that there is nothing hacker-proof. The following instructions/illustrations teach you how to make gmail default to SSL mode.

1.Type in to your browser the URL: http://www.gmail.com or simply www.gmail.com. Enter your username without the @gmail.com, your password, and press enter.


2.Click SETTINGS found at the upper right hand corner of your gmail window.


3.Under SETTINGS, click GENERAL.


4.Under GENERAL, scroll down until you find the BROWSER CONNECTION option. Choose ALWAYS USE HTTPS. Click SAVE SETTINGS and you’re done.

Just On Top